用wordpress的站长都知道,wp默认是动态地址,其实动态地址也没什么不好,只是seo界貌似都在辔亿呶邂说静态地址的收录相对要比动态地址好些,在此,草根站长网wbhcz给出设置wordpress伪静态的方法,希望对大家有用。这里先说说wordpress伪静态是如何设置的打开wordpress后台 找到 设置——固定连接
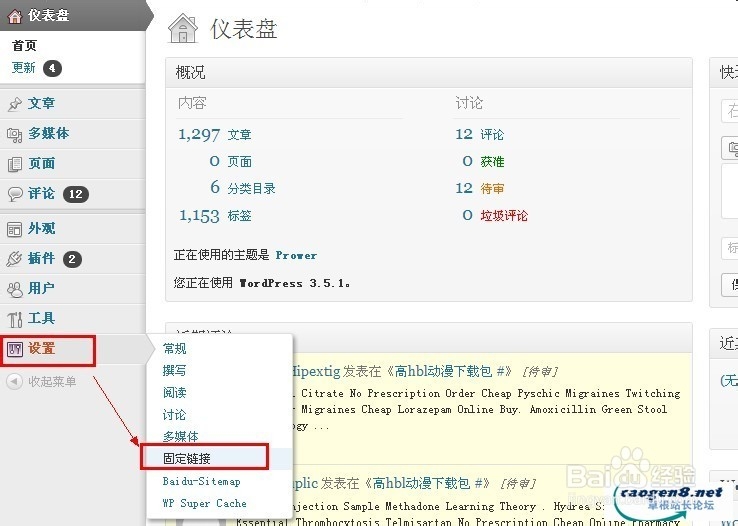
一般我们的固定连接都是下面的动态地址模式 如图
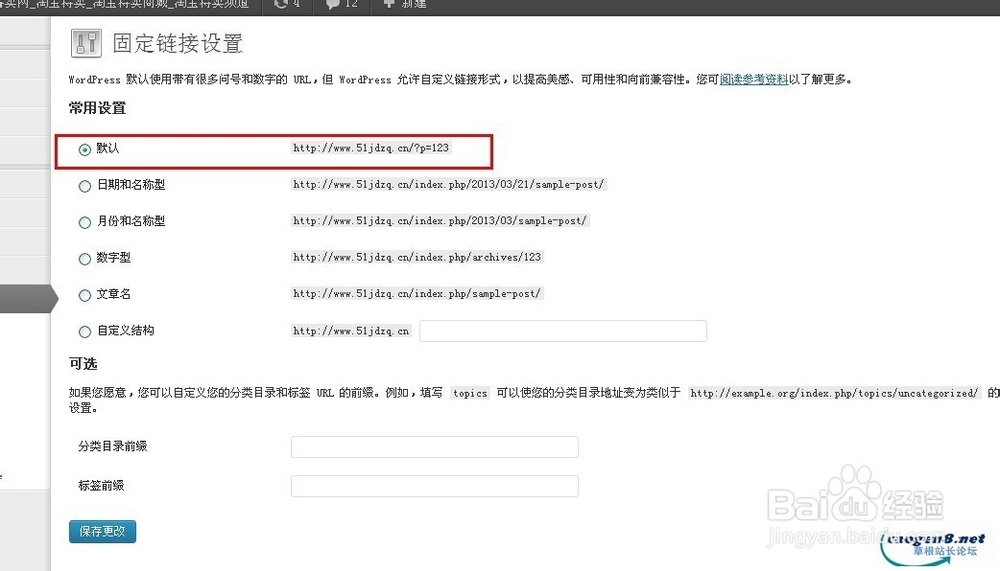
那么,我们要改为固定连接,也就是静态地址,怎么改呢?很简单,点击最下面的自定义结构 然后输入/%post_id%.html,然后保存更改,地址就会变为静态地址了,如图

但是,如果你什么都不做,光是修改这个地址,你到前台,会发现你的文章根本就打不开,这是因为你还没有做网站伪静态设置而导致的下面我们来说说如何进行网站伪静态设置第一种:主机如果有Rewrite组件的情况下,上传一个文件即可实现首先我们复制下面代码
[ISAPI_Rewrite]
# 3600 = 1 hour
CacheClockRate 3600
RepeatLimit 32
# Protect httpd.ini and httpd.parse.errors files
# from accessing through HTTP
# Rules to ensure that normal content gets through
RewriteRule /sitemap.xml /sitemap.xml [L]
RewriteRule /favicon.ico /favicon.ico [L]
# For file-based wordpress content (i.e. theme), admin, etc.
RewriteRule /wp-(.*) /wp-$1 [L]
# For normal wordpress content, via index.php
RewriteRule ^/$ /index.php [L]
RewriteRule /(.*) /index.php/$1 [L]
把这个代码放到记事本里面,保存为httpd.ini然后直接把这个文件上传到根目录即可打开伪静态页面如果上面这个传上去不行,请把下面代码复制下来,替换掉刚才保存的代码再试试
[ISAPI_Rewrite]
# 3600 = 1 hour
CacheClockRate 3600
RepeatLimit 32
# Protect httpd.ini and httpd.parse.errors files
# from accessing through HTTP
# wordpress 伪静态规则
# For tag(中文标签以及标签翻页的规则)
RewriteRule /tag/(.*)/page/(d+)$ /index.php?tag=$1&paged=$2
RewriteRule /tag/(.+)$ /index.php?tag=$1
# For category(中文分类以及分类翻页的规则)
RewriteRule /category/(.*)/page/(d+)$ /index.php?category_name=$1&paged=$2
RewriteRule /category/(.*) /index.php?category_name=$1
# For sitemapxml
RewriteRule /sitemap.xml /sitemap.xml [L]
RewriteRule /sitemap.html /sitemap.html [L]
RewriteRule /sitemap_baidu.xml /sitemap_baidu.xml [L]
RewriteRule /favicon.ico /favicon.ico [L]
# For file-based wordpress content (i.e. theme), admin, etc.
RewriteRule /wp-(.*) /wp-$1 [L]
# For normal wordpress content, via index.php
RewriteRule ^/$ /index.php [L]
RewriteRule /(.*) /index.php/$1 [L]
把这个代码放到记事本里面,保存为httpd.ini然后直接把这个文件上传到根目录即可打开伪静态页面第二种:复制下面代码到记事本
<?php
$qs = $_SERVER['QUERY_STRING'];
$_SERVER['REQUEST_URI'] = substr($qs, strpos($qs, ':80')+3);
$_SERVER['PATH_INFO'] = $_SERVER['REQUEST_URI'];
include('index.php');
?>
然后把文件保存为 404.php然后把这个文件上传到网站根目录但是这里要说明一下,你必须在你的空间的控制面板上,把404自定义错误改为/404.php否则不会生效,这里附上两种模式,一般你买空间的地方都有控制面板,如果没有控制面板,你可以联系空间商,叫他给你设置404错误为 /404.php即可


我这里只列出了两种,基本上都大同小异,只要你找到修改自定义错误的地方,就可以运用这两个方式中的一种实现自定义404错误页做好后打开首页,看看伪静态设置是否成功?
