1、一、弹出方式一1.alert弹框(1)demo目录--------app.component.ts--------app.component.html--------app.module.ts--------detail(文件夹)------------detail.component.ts------------detail.component.html(2)demo代码app.module.ts导入必要的BootstrapModalModule 和ModalModule ,再注册它们

2、app.component.ts编写这个按钮的动作showAlert()

3、detail.component.html编写alert弹框的布局

4、detail.component.ts创建模态框组件,需要创建一个组件,然后由 ngx-bootstrap-model 帮忙引导启动对于这个组件需要继承 DialogComponent<T, T1> 类,包含两个参数:T 外部传参给模态框的类型。T1 模态框返回值类型。因此,DialogService应该是DialogComponent的一个构造函数的参数。

5、confirm弹框(1)demo目录--------app.component.ts--------app.component.html--------app.module.ts--------confirm(文件夹)------------confirm.component.ts------------confirm.component.html(2)demo代码app.module.ts导入必要的BootstrapModalModule 和ModalModule ,再注册它们,这些都跟alert弹框一样,因为这些都是方法一的弹出方式

6、app.component.html创建一个可以弹出模态框的按钮

7、app.component.ts编写这个按钮的动作showConfirm()

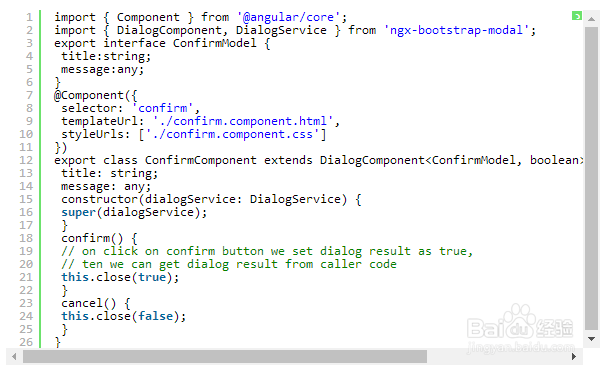
8、confirm.component.html编写confirm弹框的布局

9、confirm.component.ts创建模态框组件
10、内置弹框(1)demo目录--------app.component.ts--------app.component.html--------app.module.ts(2)demo代码内置弹框也包括 alert confirm prompt 三种形态,都有一些内置的样式app.module.ts

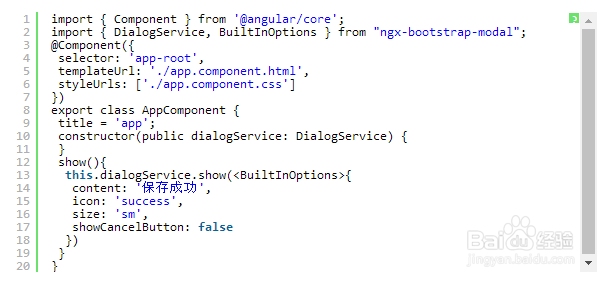
11、app.component.ts很简单,连组件的布局都不用写,传入一些参数比如图标icon,大小size等
12、二、弹出方式二还是跟上一种方法一样,先安装ngx-bootstrap-modal,然后导入bootstrap样式表1.demo目录--------app.component.ts--------app.component.html--------app.module.ts2.demo代码app.module.ts导入相应模块,并且注册它们


13、三、最终效果将上面所有的弹框全部写在一起,然后效果就是这样的

